
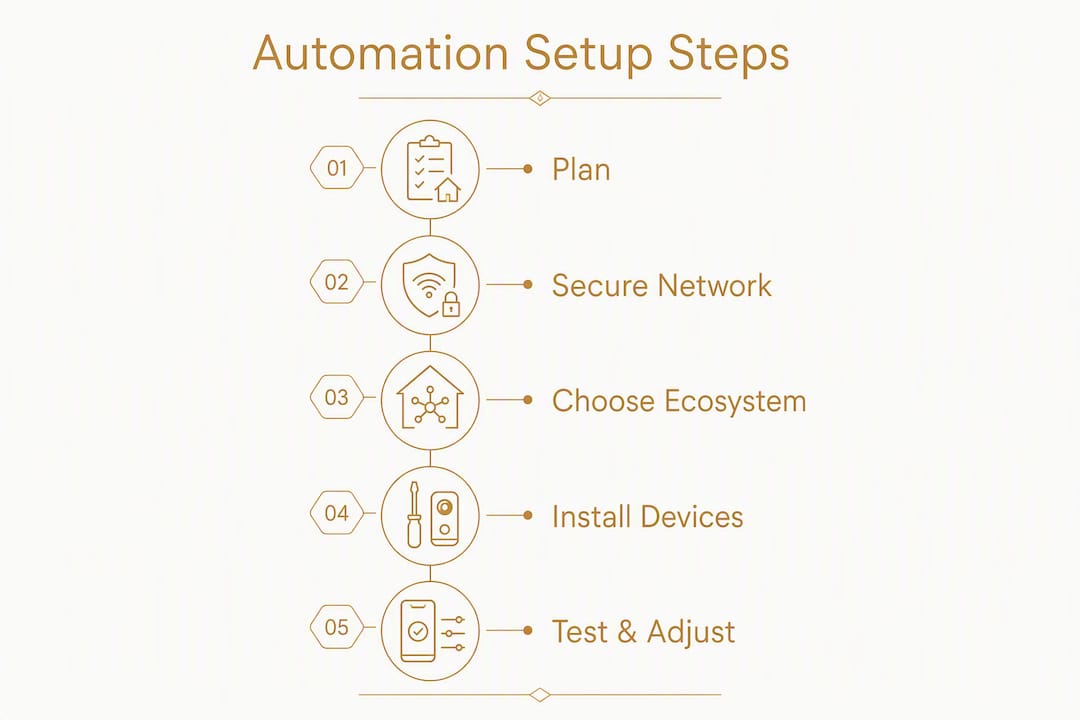
Do these five things in week one after collecting your keys: confirm every Ethernet drop is live, create your primary ecosystem account with two-factor authentication enabled, set up a dedicated guest/IoT Wi-Fi SSID, commission one device in one room, and schedule a firmware check for all pre-installed hardware. That sequence prevents the most common new-unit mistakes before they become expensive fixes.
Day 1:
- Locate and test every Ethernet port; map which rooms have wired drops
- Create your ecosystem account (Apple ID, Google Account, or Amazon account) and enable 2FA immediately
- Set up a separate IoT SSID on your router with a strong, unique password
Days 2–3:
- Commission your first device (a smart plug or bulb works well) in the living room or entry
- Download the hub or ecosystem app and verify the device appears correctly
End of week:
- Run firmware updates on all pre-installed devices
- Photograph or document every wiring panel, device label, and developer-provided credential sheet for future troubleshooting
Keep that documentation somewhere accessible. Installers and support teams will ask for it.
Table of Contents
- What should you check at developer handover for smart-home features?
- Does your new unit's network actually support smart-home devices?
- Which ecosystem should you choose for a new condo unit?
- What are the phases of a new-unit automation project?
- A room-by-room rollout plan that actually works
- Matter commissioning checklist for new condo units
- Security steps every new-unit buyer must take on day one
- What does a new-unit automation project realistically cost?
- Questions to ask the developer, agent, or installer
- Key Takeaways
- What buyers consistently get wrong when automating a new condo
- Useful sources
- FAQ
What should you check at developer handover for smart-home features?
Developers advertise smart-home integration at varying levels of completeness. Some units arrive fully commissioned; others have wiring in place but no devices installed. Knowing what to verify protects you from discovering gaps after move-in.
At viewing or pre-handover:
- Count Ethernet drops per room and confirm they terminate at a patch panel or router location
- Check that switch locations have neutral wires (required by most smart switches)
- Ask whether any sensors, locks, or access points are pre-wired or pre-installed
- Confirm whether a central controller or hub is included, and if so, where it is mounted
Documentation to request from the developer or agent:
- Network wiring diagram showing Ethernet drop locations and panel layout
- Device inventory listing every pre-installed smart device, its model, and firmware version
- Vendor contact and warranty terms for pre-installed hardware
- Account handover procedure: who currently holds admin credentials, and how they transfer to you
Questions to ask at handover:
- Who manages the cloud account for pre-installed devices, and how do I take ownership?
- Which devices carry a "Works with Matter" or Matter-certified badge?
- Is there an uninterruptible power supply (UPS) for the central hub?
- Are firmware updates covered under the developer's maintenance terms?
Hougang-central-residences provides developer-level documentation for its smart-home features checklist — request the wiring diagram and device inventory at handover before signing off.
Does your new unit's network actually support smart-home devices?
The network is the foundation. A flaky router or misconfigured Wi-Fi band will cause device dropouts that look like hardware failures but are purely infrastructure problems.

Wired hub placement: Connect your primary hub to the router via Ethernet rather than Wi-Fi. A wired connection reduces latency and eliminates the single biggest source of hub instability. If the hub supports Ethernet, cable it directly.
Wi-Fi configuration: Keep a dedicated 2.4GHz SSID active for IoT devices. Many modern routers default to 5GHz-only or band-steering, which can prevent Matter and Zigbee devices from connecting. Enable mDNS (also called Bonjour) on your router — Matter device discovery depends on it.
Protocols that reduce Wi-Fi load: Thread and Zigbee devices communicate over their own mesh radio rather than Wi-Fi, which matters once you pass roughly 15–20 connected devices. A Thread border router bridges Thread sensors and locks to your main network without adding Wi-Fi congestion.
| Unit size / device count | Recommended network approach |
|---|---|
| Studio–1BR / 1–10 devices | Single router with 2.4GHz IoT SSID |
| 2–3BR / 10–20 devices | Mesh Wi-Fi system + wired hub |
| 4–5BR / 20+ devices | Mesh + wired hub + Zigbee/Thread border router |
Pro Tip: Place your router or mesh node in a central location, not inside a cabinet or behind the TV. Signal loss through walls and furniture is the most common reason smart devices drop off unexpectedly.
Which ecosystem should you choose for a new condo unit?
Pick your ecosystem before buying a single device. The choice shapes which hardware you can add later, which voice assistant you use daily, and how much local processing you get.
The clearest starting point for new buyers: adopt a Matter-forward strategy. Matter-certified devices work across Apple Home, Google Home, Amazon Alexa, Samsung SmartThings, and Home Assistant, so you are not locked to one platform. Then choose the ecosystem that matches your phone and smart-speaker preferences.
- Apple Home: Best if your household runs iPhones and iPads. Offers strong local processing via HomePod mini as a Thread border router.
- Google Home: Natural fit for Android users. Google Nest speakers double as Thread border routers.
- Amazon Alexa: Widest device compatibility; Echo (4th gen or newer) supports Matter commissioning.
- Home Assistant: Best for buyers who want full local processing and no cloud dependency. Runs on Home Assistant Green or a Raspberry Pi; setup takes an afternoon.
Compatibility checks to run before buying:
- Confirm pre-installed devices carry a Matter badge or are listed as compatible with your chosen ecosystem
- Check whether the developer's hub supports local automation or requires a cloud connection
- Verify that Thread border router hardware is included or planned
Pro Tip: Avoid mixing two ecosystems in one unit. The "app overload" problem — where locks live in one app, lights in another, and sensors in a third — is the fastest way to stop using automation entirely. Pick one platform and buy toward it.
What are the phases of a new-unit automation project?
A professional smart-home install follows a defined sequence. DIY projects benefit from the same structure.
- Discovery and site design (1–3 days): Map Ethernet drops, confirm power at switch locations, identify hub placement, and finalize device list.
- Network prep (1 day): Configure router, set up IoT SSID, place mesh nodes, and cable hub to router.
- Hub and device install (1–3 days for basic; multiple weeks for whole-unit): Mount hub, pair devices room by room, and run firmware updates before pairing.
- Programming and commissioning (1–2 days): Build automations, create scenes, and configure user accounts.
- Testing and handover (half day): Verify every device responds, test offline behavior, and walk through the system with all household members.
DIY vs. professional: Go DIY for a starter build of 10–15 devices if you are comfortable with networking basics. Hire a professional integrator when the unit has structured wiring needs, 20+ devices, or when local processing and a maintenance SLA matter. A professional install typically includes a site study lasting 3–10 business days before hardware work begins.
A room-by-room rollout plan that actually works
Start with one room and one job. Automating the entire unit at once leads to configuration errors that are hard to trace. Nail a single function first, validate the network, then expand.
Recommended first room: living room or entry. Both deliver immediate, visible value.
- Entry: Smart lock + video doorbell. The "arriving home" routine is the most satisfying early automation and tests your network under real conditions.
- Living room: Smart speaker, one smart plug, and two or three smart bulbs. Build a "goodnight" scene that turns everything off with one command.
- Master bedroom: Smart bulbs on a wake-up schedule and a smart thermostat or AC controller. A gradual brightness increase at 6:30 AM is more useful than most buyers expect.
- Kitchen: Smart plugs on countertop appliances. Simple, low-cost, and immediately practical.
Three automations to build in week one:
- Goodnight scene: Locks the door, turns off all lights, sets the thermostat.
- Arriving home routine: Triggered by phone location or door unlock; turns on entry and living room lights.
- Motion-triggered hallway lights: Active midnight–6 AM only, so they do not fire constantly during the day.
True automation means moving from app-driven taps to routines that run without you. Those three cover the most-used moments in a condo day.
Matter commissioning checklist for new condo units
Matter is the universal smart-home standard that lets one device work across multiple ecosystems. Commissioning it correctly the first time saves hours of troubleshooting.
Pre-commissioning checks:
- Router has mDNS/Bonjour enabled (on by default for most consumer routers; verify in advanced settings)
- 2.4GHz SSID is visible and active, not merged into a band-steering combined network
- Bluetooth is enabled on your commissioning phone
- IPv6 is enabled on the router, or confirm IPv4 fallback is active
Commissioning steps:
- Power on the device; it enters commissioning mode automatically (usually a blinking LED)
- Locate the Matter QR code on the device or packaging
- Open your ecosystem app, tap "Add device," and scan the QR code
- Assign the device to a room within the app
- Test basic control (toggle on/off, check sensor state)
What to record during commissioning:
- Device model and firmware version
- Room assignment and physical location
- Which ecosystem it was commissioned to first (relevant if you add a second platform later)
Common failure modes: Device not found usually means the 2.4GHz SSID is hidden or mDNS is blocked. Thread devices that fail to commission need a Thread border router within roughly 30 feet.
Security steps every new-unit buyer must take on day one
Your ecosystem account is effectively the master key to your home. Treat it that way.
- Enable two-factor authentication on your Apple ID, Google Account, or Amazon account before commissioning a single device
- Use a unique, strong password for the ecosystem account and for your router admin panel
- Set up a separate guest/IoT SSID so smart devices are isolated from personal computers and phones
- For locks and alarms, use a hub that supports local automation so those devices work even when the internet is down
- Assign admin access only to primary household members; use guest or limited-access profiles for others
- Schedule monthly firmware checks for all devices and the hub
Pro Tip: Change the default admin password on your router and hub immediately. Factory defaults are publicly documented and are the first thing an attacker tries.
Document role assignments (who has admin, who has guest access) in your handover file. If you ever need a professional to service the system, that record saves significant time.
What does a new-unit automation project realistically cost?
| Project scope | Typical cost range | Expected timeline |
|---|---|---|
| Starter (speaker, plugs, several bulbs) | affordable | short timeframe |
| Mid-level (hub, sensors, lock, moderate devices) | moderate cost | several days |
| Whole-unit professional install (many devices) | higher cost | multiple weeks |
A basic starter kit (smart speaker, 2–3 smart plugs, and 3–4 smart bulbs) typically costs between $80 and $150; local-processing hubs and mid-range hubs are generally priced from $99 to $149. A broader beginner setup with essential devices may cost a few hundred dollars.
Recurring costs to budget for:
- Optional cloud subscriptions for advanced features (varies by platform; many core features are free)
- Professional maintenance or monitoring services if included in an installer SLA
- Replacement devices as firmware support ends (typically 5–7 years for most hardware)
The whole-unit professional figure varies significantly by unit size, device count, and whether structured wiring is already in place. Get at least two quotes from certified integrators before committing.
Questions to ask the developer, agent, or installer
Technical questions:
- How many Ethernet drops are installed, and where do they terminate?
- Is there a central controller or hub, and does it support local processing?
- Which devices are Matter-certified or carry a "Works with Matter" badge?
- Where are access points or mesh nodes planned or pre-wired?
Operational and service questions:
- Who currently holds the admin credentials for pre-installed devices, and how do I take ownership?
- Are firmware updates included in the developer's warranty or maintenance terms?
- Is there a maintenance SLA, and who is the vendor contact for pre-installed hardware?
Installer questions:
- Does the system support local automation if the internet goes down?
- What happens to locks and alarms during an internet outage?
- Is handover training included, and will you provide written documentation?
Buyers evaluating mixed-use condo developments should also ask how building-level systems (lobby access, intercom) integrate with in-unit smart-home platforms, since those interfaces vary significantly by developer.
Key Takeaways
Setting up home automation in a new condo unit requires five immediate actions, a reliable network foundation, one consistent ecosystem choice, and security safeguards in place before any device is commissioned.
| Point | Details |
|---|---|
| Secure accounts first | Enable 2FA on your ecosystem account before commissioning any device. |
| Wire the hub | Connect your primary hub to the router via Ethernet for reliable performance at scale. |
| Start with one room | Commission one device in one room first; validate the network before expanding. |
| Matter for flexibility | Choose Matter-certified devices to avoid being locked to a single ecosystem. |
| Request handover docs | Ask the developer for wiring diagrams, device inventory, and admin credential transfer procedures. |
What buyers consistently get wrong when automating a new condo
The most common mistake is trying to automate everything at once. Buyers arrive with a list of 30 devices, commission half of them in a weekend, and spend the next month troubleshooting dropouts they cannot isolate because too many variables changed simultaneously. The room-by-room approach is not just a beginner's shortcut. It is the correct method, because it lets you confirm the network is solid before adding load.
The second mistake is buying non-Matter devices to save $10–$20 per unit. Three years later, the manufacturer discontinues the app, the devices stop working, and the replacement cost is higher than the original savings. Matter exists precisely to prevent that outcome.
What actually matters most for condo buyers is straightforward: a reliable wired network, one ecosystem chosen deliberately and stuck to, and security safeguards applied at handover before anything else. Buyers who get those three right rarely have serious problems later.
Hougang-central-residences is designed with smart-home integration built in from the ground up, which means the infrastructure questions above are already answered before you collect your keys. That gives you a meaningful head start. The condo app-based features at Hougang-central-residences connect building-level systems directly with in-unit automation, reducing the integration work buyers typically handle themselves.
Useful sources
- How to Setup Matter Devices: Step-by-Step | YMH — comprehensive commissioning walkthrough covering all major ecosystems, Thread border routers, and multi-admin setup
- Smart Home System Installation: Complete Setup Guide — professional installation phases, hub placement best practices, and UPS recommendations
- Home Automation System Installation: Complete Guide for Modern Homes — professional installer perspective on discovery, site study, and handover timelines
- Getting Started with Home Assistant — official guide for setting up a local-processing hub with no cloud dependency
- How to Set Up a Smart Home: Complete Beginner's Guide — starter kit recommendations and ecosystem selection criteria
Next steps: Request your developer's wiring diagram and device inventory before handover. If the unit has 20 or more pre-installed devices, schedule a network audit with a certified integrator before move-in day.
FAQ
What is the first thing to do when setting up home automation in a new unit?
Enable two-factor authentication on your ecosystem account and confirm your Ethernet drops are live before commissioning any device. Those two steps prevent the most common security and connectivity failures.
How many devices can a single Wi-Fi router handle for a smart home?
A single router typically handles a limited number of smart devices reliably; beyond that, a mesh system combined with a wired hub and Zigbee or Thread devices significantly improves stability.
Do Matter devices work with all smart-home platforms?
Yes. Matter-certified devices work with Apple Home, Google Home, Amazon Alexa, Samsung SmartThings, and Home Assistant, and a single device can be added to multiple platforms simultaneously using the multi-admin feature.
What does a starter smart-home setup cost for a new condo unit?
A basic starter kit (smart speaker, 2–3 smart plugs, and 3–4 smart bulbs) typically costs between $80 and $150; a mid-level setup with hub, sensors, lock, and moderate device count usually costs more, within a moderate budget range.
When should a new condo buyer hire a professional installer?
Hire a professional when the unit has structured wiring needs, more than 20 devices planned, or when local processing and a maintenance agreement are priorities; a professional install typically begins with a site study of 3–10 business days before hardware work starts.